CPS System Better than Perma-Column
This is a comparison between the two post-frame construction methods. One using CPS and one using Perma-Column, showing why the CPS system remains better than Perma-Column.
as a guide to mount the bracket.
on center, even on a butt joint.
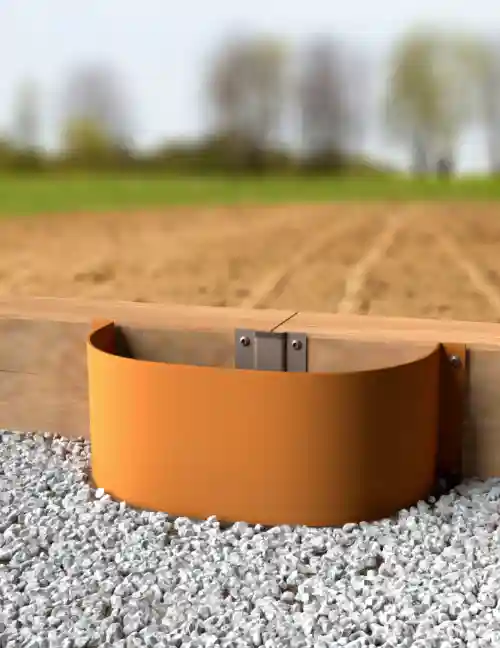
connects with your sonotube.
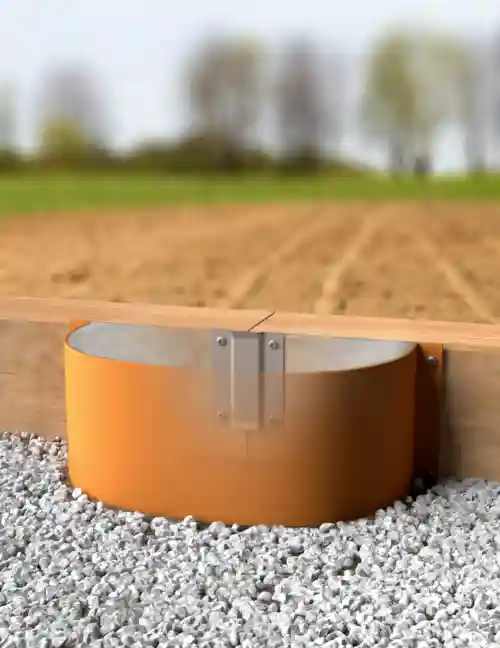
the wet concrete and you’re set!

Watch this video to see why the CPS pole barn kit is the superior option to others like Perma-Column.
CPS System vs. Perma-Column FAQ
Wind Shear
The CPS system is stronger in wind-shear situations. CPS wooden columns have notch connections. And are anchored into solid quarter-inch steel brackets grounded in bell-shaped concrete piers. This combination is much stronger than a slender concrete pier in hand-packed soil that Perma-Column uses.
Watch this video for a real-life example of a farmer whose newly built machine barn collapsed after being built with Perma-Column concrete and brackets.
Brackets
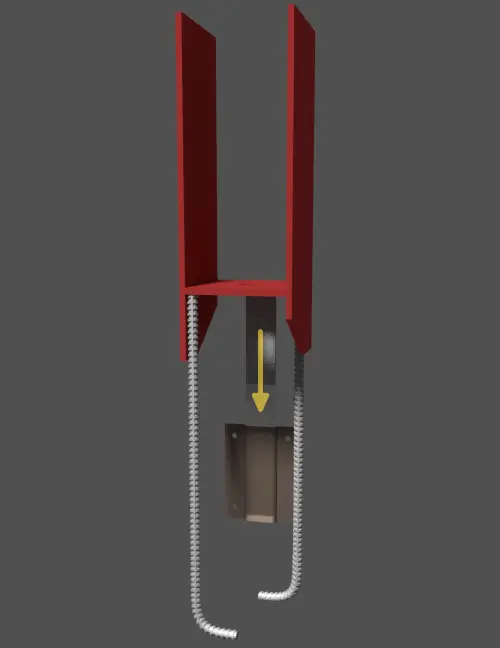
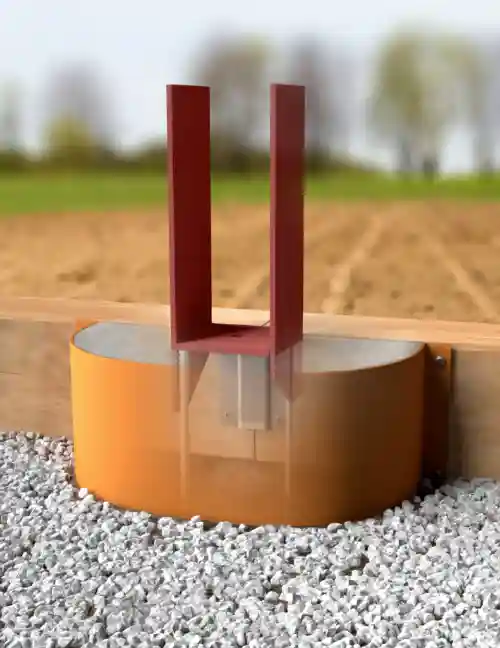
CPS Brute Force brackets have been specially engineered to withstand the test of time. In the top image on the left, you can see that CPS brackets have additional steel support welded to the rebar that is inserted into concrete for support. In addition, the notch on the bracket is inserted into the easy-mount clip to hold it in place as the concrete settles.
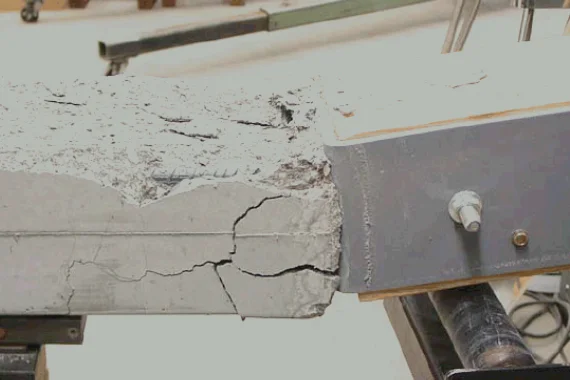
Perma-Column brackets are u-shaped with the rebar welded just to the bottom of the bracket and inserted directly into the concrete. According to an in-depth research article from the University of Wisconsin, “If a U-shape with a thin base is created, as is done with Perma-columns, a very significant problem develops when the bracket is placed under a bending load. As a U-shaped object is placed in bending it will attempt to straighten as it transfers the applied load. This attempt to straighten crushes the concrete or buckles the steel and ultimately renders the column useless.” View the bottom image on the right to see what can happen when a Perma-Column bracket fails.
Shipping Cost
CPS shipping costs are significantly less as each bracket is one-eighth the weight and bulk.
Installation Time
CPS brackets are a significantly faster installation process. Due to the easy mount clip system which allows the clip to be level and set by one person in about two minutes.
Production Handling
The difference between handling a CPS bracket and a Perma-Column is vast. CPS brackets are easily handled by a single worker. A Perma-Column requires either a skid steer or several individuals to lift and carry on the job site. It can be shipped to your shop and you can easily transport them in a standard pick-up truck to the construction site.
Job Weather Conditions
CPS brackets can be installed in wet weather. Perma-Columns would be difficult to place due to the need for machinery to place them, and the need for backfilling to support them, wet soil would make this difficult.
Cost Per Column
Our cost per column is between $60 and $68 per kit (EZ clip, fasteners, plastic concrete form, and CPS bracket).
Perma-Column averages $200.
Downforce
This is where CPS is far superior. Perma-Column provides a 4×4-inch bottom profile at best. Perma-Column suggests pouring pancake footings to increase downforce. These footings need to be poured to precise heights to keep the building level. This is done at four feet under the ground, not a simple process. These pancakes can more easily crack as all concrete does, especially with 4×4 center pressure on the pancake. The CPS system uses bell augering can provide significantly more downforce support as the bottom of the pier is two times the diameter of the opening, for example, a 12” top pier is 24” at the bottom. Meaning the CPS system can support much more weight than does the Permacolumn system. In many locations, a Perma-Column might not meet the downforce engineering standards. The tapered bell shape is less prone to cracking and the solid concrete pier provides more support than the 4×4 PermaColumn. Additionally, it is less likely to be pulled up by storms, hurricanes, and tornados.
Lateral Support
This is another point that CPS is far superior. Perma-Column is supported laterally by soil that has been excavated and backfilled by hand. We have all seen utility poles that are tilted over from wind, soil, and tension effects. This is what happens to piers that rely on the soil for lateral support. CPS systems use a belled pier which is formed in unexcavated soil with a pier bottom and shaft that is twice the size of a Perma-Column pancake and 4×4 column. Additionally, it is less likely to be pushed over by storms, hurricanes, and tornados.
Heave Proofing
Perma-Column provides only a small metal add-on to prevent frost heaving. This metal could decay over time and become separated from the column. CPS provides belled columns that are impervious to frost heave and will never rot and separate from the column. The difference in this area is massive between the two systems.
Center Notched Wood Columns
The CPS system is so accurate on installation that the wood columns can be notched to receive the trusses. Perma-Column piers require a leveling device on the bottom or backfilling to adjust, or a very accurate pour of concrete pancake, all of which do not yield stable accurate vertical heights. This requires the use of doubleheaders at the top of the building to support the trusses, this adds labor and materials to the project and reduces the overall strength. CPS truss system is much more resistant to up-forces of wind.
Installation Process
CPS system saves time in the following installation areas:
- Splashboards: no need to drill them into the concrete.
- No need for bracing the post from two directions at all on installation.
- No need to backfill for vertical leveling.
- No need to backfill for horizontal leveling.
- Brackets can be installed by one person.
- All components weigh no more than 20 lbs v. Perma-Column 150 lb weight.
- Allows for framing on the ground while Perma-Column does not.
Leveling Process
CPS brackets are leveled based on the splash boards using the easy-mount clips. Leveling the bracket takes one minute. Just slide the bracket into wet concrete and the easy mount clip holds the bracket perfectly level for level posts as well. Perma-Column requires at least two people to level, backfill, brace it, and compact soil. This is done while holding up a heavy concrete pier and a wooden post. There is ample opportunity for the Perma-Column post to twist out of true or shift in any direction as the soil compacts from one side or the other.
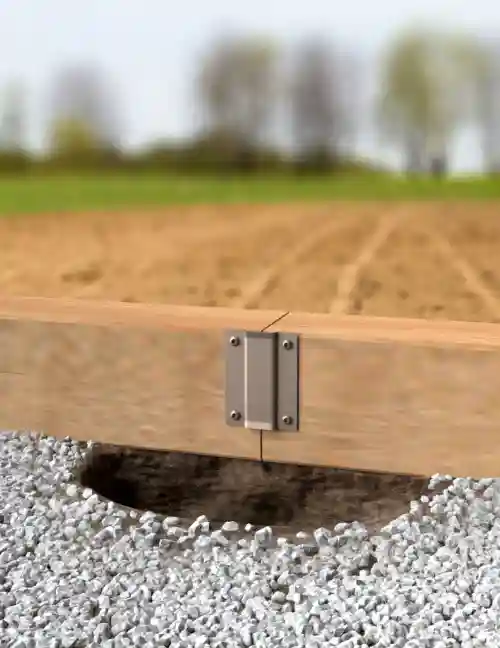
Splashboards
With CPS the splash boards are installed based on the initial level lines. Which allows the splash boards to form a straight line. They will show no exterior bolts and be connected to the concrete via 3-inch anchors from the easy-mount clips. Perma-Column splash boards require pre-drilling into the concrete columns, with the potential of hitting the rebar in the column or cracking the slender Perma-Column finish. Then it requires the use of concrete screws to attach the splashboards to the columns. The splashboard follows the line of the columns and can be uneven as it is installed after the columns are fixed.
Backfilling
CPS does not require backfilling to level and brace the pier. This is only necessary if you had to have some piers off grade using SonoTubes. Our columns are set into undisturbed soil making a very strong foundation. Perma-Column piers are set into holes that are much larger than the pier and require backfilling and compacting the soil. Installing Perma-Columns off grade is very difficult. Perma-Column requires backfilling and soil compaction. Mixing of clay and topsoil can lead to varying effects. Shifting soil over time can take columns out of proper level and the height can settle over time.
Height Issues
With CPS vertical height is determined at the installation of the splashboards which are set in place first and checked with a level or laser. Next, we just add the Easy Mount Clip. Just slide the bracket into the clip and the height is perfect from column to column. Perma-Column is set vertically by the height of the base of your hole which is typically four feet down it is very hard to unfill or backfill to achieve the correct height. Even harder if you are creating a concrete footing. Perma-Column results in heights of columns that vary from column to column. This requires either trimming the longer columns or heaven forbid one is too short. This height variation is often covered over by a doubleheader at the top of the building which requires leveling again, and additional materials that the CPS’s method does not require.
Framing Issues
CPS allows for wall framing to be done on the ground and to be lifted into place. This type of framing is safer and faster than the Perma-Column System. Perma-Column requires the horizontal framing to be done vertically. This requires lifts, ladders and climbing on the structure. It requires several people to lift and feed the lumber to those upon the structure.
Off-grade Issues
CPS can easily be used in foundations that have a portion of the initial foundation slightly off-grade. This becomes a greater issue with Perma-Column as it relies on the loose soil to keep its position.
Bad Backfill
CPS does not use backfilling for its system this avoids inconsistent material surrounding your pier. With Perma-Column installations, you could end up with a mixture of gravel, dirty rock, topsoil, and clay. All hold different amounts of moisture some can even act as a french drain holding water against the column causing rot, freezing heaving and twisting.